Published on 20 May 2016 by Gildas Garcia and Kevin Maschtaler

Is the blockchain a revolution? The technology that powers Bitcoin sure has the potential to disrupt the entire Internet, as we explained in a previous post. But how can you, a developer, use the blockchain to build applications? Are the tools easy to use, despite the complexity of the underlying concepts? How good is the developer experience?
We wanted to find out, and there is no better tutorial than developing an app from scratch. So we’ve made a simple decentralized ad server called Zero Dollar Homepage, powered by blockchain. This is the story of our experience. Read on to learn how hard the blockchain is for developers today.
Application Concept
The blockchain shines when it replaces intermediaries. We chose to focus on Ad Platforms, which are intermediaries between announcers (who buy visibility) and content providers (who sell screen real estate). Our project was to build a decentralized ad platform running on the blockchain.
Since the famous Million Dollar Homepage experiment, innovating in the field of paid ads can’t make you rich anymore.

Instead, we chose to build a tool that allows to display ads for free - a Zero Dollar Homepage. For free, but not for nothing: advertisers exchange ad visibility for open-source contributions. So we’ve built a decentralized app to manage how ads display on a particular page. Advertisers need to take up a coding challenge to be able to put their ads on this page.
User Workflow
In concrete terms, whenever we merge a Pull Request (PR) on one of marmelab’s open-source repositories, a GitHub bot comments on the PR, and invites the PR author to publish their ad on the ad platform admin panel.
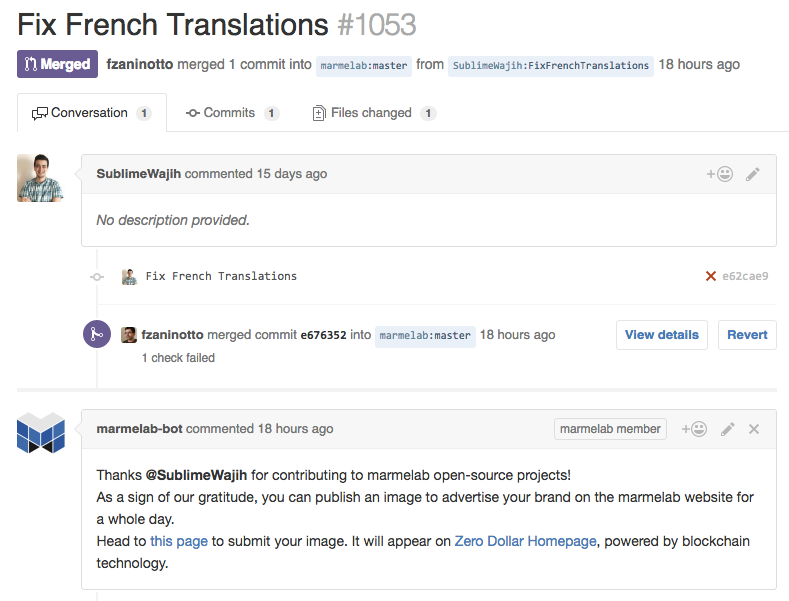
Following the link contained in the comment, the PR author is asked to sign in with their GitHub credentials. Then, they can upload an ad - in fact, a simple image. This image is added to the list of images uploaded by other PR authors, in chronological order.

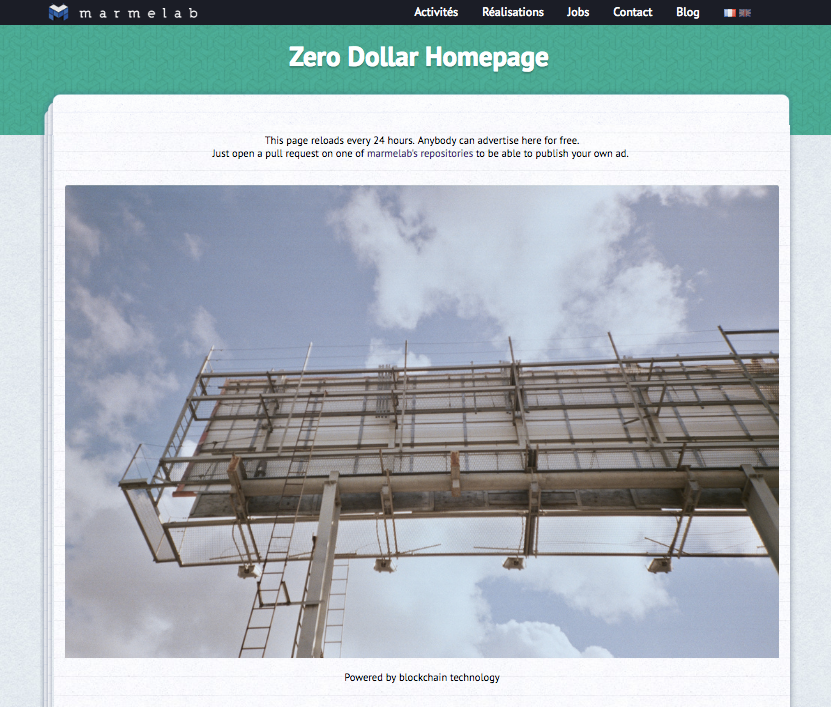
Each day at midnight, an automated script takes the next image in line (using a FIFO ordering), and displays it on http://marmelab.com/ZeroDollarHomepage/ for the next 24 hours.

Note: The entire process requires no intermediary, but in order to avoid the display of adult imagery on our site, we validate the uploaded images through the Google Vision API before putting them online.
Architecture
Here is how we separated responsibilities in each of the 4 use cases of an ad platform:
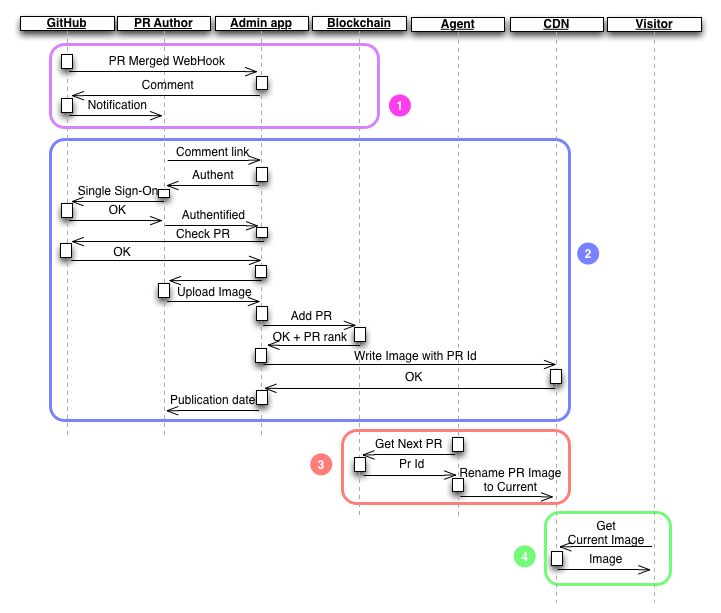
- Open-source contributor notification Whenever an open-source PR gets merged on one of our repositories, GitHub notifies the admin app with the PR details. The app publishes a comment on the PR to notify the contributor. The comment contains a link back to the admin app, with the PR details.
- Claim and image upload Following the comment link, the contributor goes to the admin app. He must sign in with his GitHub credentials to be authenticated. The admin app then calls GitHub to grab the PR details, and to check that the contributor is actually the PR author. If it’s OK, the admin app displays an image upload form. When the contributor uploads an image, the admin app pushes the PR id to the blockchain, and uploads the image to a CDN (named after the PR id). The admin app displays the approximate date of publication of the image based on the number of valid PRs with an image still waiting in the blockchain.
- Ad placement Every 24 hours, a cron asks the blockchain for the next PR not yet displayed. The blockchain marks this PR as displayed and sends the ID. The cron renames the image named after the pr ID to “current image”.
- Ad display Each time a visitor wants to display the ad in ZeroDollarHomepage, it asks the CDN for the current image. It happens to be the latest published ad from the blockchain, which remains displayed at least 1 day (and until another contributor claims a PR).
This might seem surprising, as the blockchain plays a very small part in the process. But we quickly realized that the entire code of the ad platform couldn’t live in the blockchain. In fact, blockchains have very limited capabilities in terms of connectivity to the Internet, and processing power. So we delegated only the crucial ad placement tasks to the blockchain:
- Register a pull request by an authenticated contributor
- Get the last non displayed pull request, and mark it as displayed
Other tasks ended up in the admin app, outside of the blockchain, for various reasons:
- Register a pull request from a webhook Registering a pull request before it’s been claimed is useless, since the contributor may never claim it. Besides, storing data in the blockchain isn’t free, so we store only what we have to store. The downside is that any PR on our public repositories, including those created before this experiment, are eligible for the next step.
- Notify the user by posting a comment to GitHub A smart contract can’t call an external API, so it’s just not possible. Instead, we delegated this task to the admin app.
- Verify a claimed PR’s author Again, a smart contract can’t call the GitHub APIs. Instead, we moved this logic to the admin app, and made it a prerequisite before calling the blockchain.
- Store the Image In theory, you can store pretty much anything in the blockchain, including images. In practice, images cost a lot to store, and we didn’t manage to store more than one “table” (array of data) in our smart contract.
- Update the displayed ad to the next in line A blockchain has no equivalent of the
setTimeout function, or cron jobs. You might however execute some code every x blocks but it’s not related to time. Instead, we used a cron-like library on our API.
Research, documentation and first attempts
As we explained in a previous post, they aren’t many good choices when choosing a blockchain network. So we chose Ethereum.
We quickly hit our first wall. Until a few weeks ago, you couldn’t play with the Ethereum blockchain without buying Ether first, even for simple tests. Also, Ethereum didn’t really allow private blockchains in its former version (named Frontier), which made development very complicated. Anyone accessing the Ethereum network might call your test contracts. More importantly, the documentation is a volunteer initiative, and was not in sync with the development state.
Note: Ethereum bumped their version since we developed the application, switching fromFrontier to Homestead. The Ethereum community improved the documentation quality for Homestead.
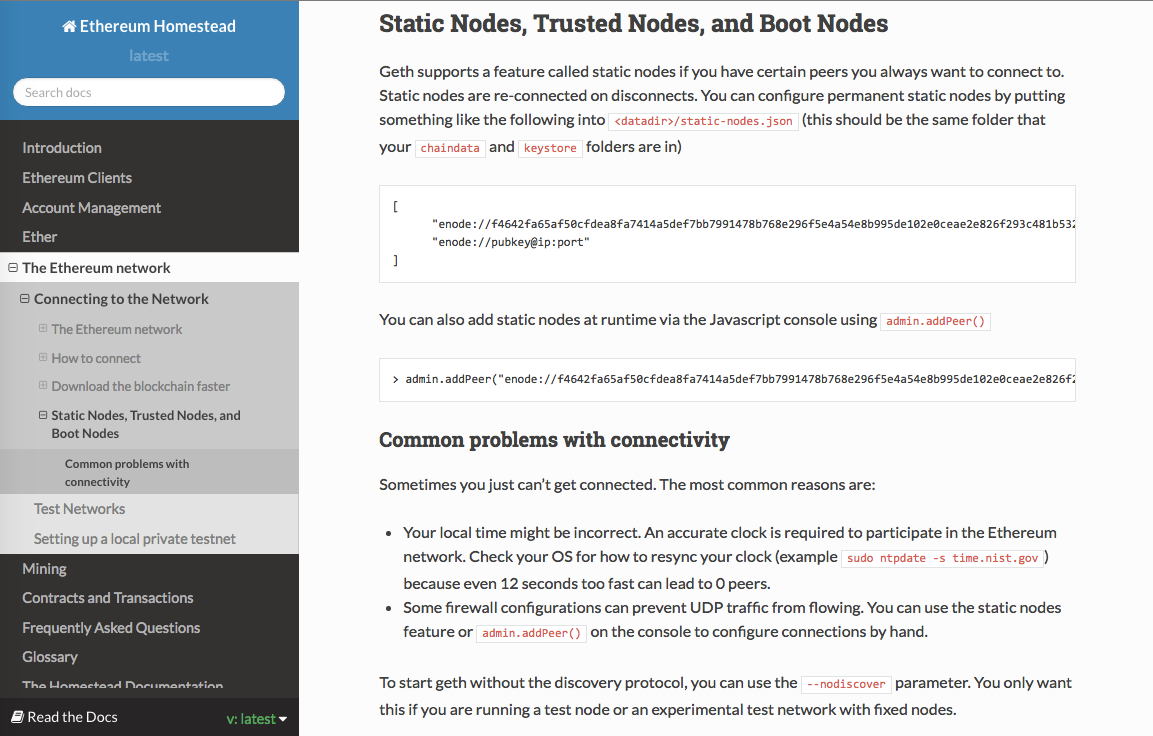
Despite these shortcomings, we managed to register three nodes on the Ethereum network across Nancy, Paris and Dijon, and to share a ping between those nodes.
In the course of our documentation search, we eventually found the Eris documentation. Eris did an excellent job at explaining Blockchains and contracts. Moreover, they especially built a layer on top of Ethereum, and open-sourced a bunch of tools to ease the process of developing smart contracts.
eris is command line tool you can use to initialize any number of local blockchains you need.
Smart Contract Implementation
A smart contract is very similar to an API. It has a few public functions which might be called by anyone registered on the blockchain network. Unlike an API, a smart contract cannot call external web APIs (a blockchain is a closed ecosystem). A smart contract may however call other smart contracts, provided it knows their address.
As with an API, the public functions are only the tip of the iceberg. A contract might be in fact composed of many private functions, variables, etc.
Smart contracts are hosted in the blockchain in an Ethereum-specific binary format, executable by the Ethereum Virtual Machine. Several languages and compilers are available to write contracts:
At marmelab, we code a lot in Javascript, so we chose to use Solidity. Solidity contracts are stored in .sol files.
The Zero Dollar Homepage Contract
The Zero Dollar Homepage contract stores the claimed pull-requests, and a queue of requests to display. The first version of the Solidity contract looked like this:
// in src/ethereum/ZeroDollarHomePage.sol
contract ZeroDollarHomePage {
    uint constant ShaLength = 40;

    enum ResponseCodes {
        Ok,
        InvalidPullRequestId,
        InvalidAuthorName,
        InvalidImageUrl,
        RequestNotFound,
        EmptyQueue,
        PullRequestAlreadyClaimed
    }

    struct Request {
        uint id;
        string authorName;
        string imageUrl;
        uint createdAt;
        uint displayedAt;
    }

    // what the contract stores
    mapping (uint => Request) _requests; // key is the pull request id
    uint public numberOfRequests;
    uint[] _queue;
    uint public queueLength;
    uint _current;
    address owner;

    // constructor
    function ZeroDollarHomePage() {
        owner = msg.sender;
        numberOfRequests = 0;
        queueLength = 0;
        _current = 0;
    }

    // a contract must give a way to destroy itself once uploaded to the blockchain
    function remove() {
        if (msg.sender == owner){
            suicide(owner);
        }
    }

    // the following three methods are public contracts entry points

    function newRequest(uint pullRequestId, string authorName, string imageUrl) returns (uint8 code, uint displayDate) {
        if (pullRequestId <= 0) {
            // Solidity is a strong typed language. You get compilation errors when types mismatch
            code = uint8(ResponseCodes.InvalidPullRequestId);
            return;
        }

        if (_requests[pullRequestId].id == pullRequestId) {
            code = uint8(ResponseCodes.PullRequestAlreadyClaimed);
            return;
        }

        if (bytes(authorName).length <= 0) {
            code = uint8(ResponseCodes.InvalidAuthorName);
            return;
        }

        if (bytes(imageUrl).length <= 0) {
            code = uint8(ResponseCodes.InvalidImageUrl);
            return;
        }

        // store new pull request details
        numberOfRequests += 1;
        _requests[pullRequestId].id = pullRequestId;
        _requests[pullRequestId].authorName = authorName;
        _requests[pullRequestId].imageUrl = imageUrl;
        _requests[pullRequestId].createdAt = now;

        _queue.push(pullRequestId);
        queueLength += 1;

        code = uint8(ResponseCodes.Ok);
        displayDate = now + (queueLength * 1 days);
        // no need to explicitly return code and displayDate as they are in the method signature
    }

    function closeRequest() returns (uint8) {
        if (queueLength == 0) {
            return uint8(ResponseCodes.EmptyQueue);
        }

        _requests[_queue[_current]].displayedAt = now;
        delete _queue[0];
        queueLength -= 1;
        _current = _current + 1;
        return uint8(ResponseCodes.Ok);
    }

    function getLastNonPublished() returns (uint8 code, uint id, string authorName, string imageUrl, uint createdAt) {
        if (queueLength == 0) {
            code = uint8(ResponseCodes.EmptyQueue);
            return;
        }

        var request = _requests[_queue[_current]];
        id = request.id;
        authorName = request.authorName;
        imageUrl = request.imageUrl;
        createdAt = request.createdAt;
        code = uint8(ResponseCodes.Ok);
    }
}
For this first attempt, we used the Eris JS libraries to communicate with our blockchain. Instanciating a contract from a Node.js file turned up to be as simple as:
import eris from 'eris';

function getContract(url, account) {
    const address = // Read address file stored on disk by the eris CLI;
    const abi = // Read abi file stored on disk by the eris CLI;
    const manager = eris.newContractManagerDev(url, account);
    return manager.newContractFactory(abi).at(address);
}
And calling it wasn’t difficult either:
function* newRequest(pullrequestId, authorName, imageUrl) {
    const contract = getContract(url, account);
    // First gotcha, when a function returns several named variables, they are returned as an Arrays
    // Second gotcha, numbers are returned as instances of BigNumber, do not forget to convert when standard numbers are expected
    const [codeAsBigNumber, displayDateAsBigNumber] = yield contract.newRequest(pullrequestId, authorName, imageUrl);
    const code = codeAsBigNumber.toNumber();

    if (code !== 0) {
        throw new Error(getErrorMessageFromCode(code));
    }

    // Return the displayDate for UI confirmation screen
    return displayDate.toNumber();
}
For more information about the Eris JS binding libraries, please refer to Eris documentation.
Unit Testing Contracts
We love Test Driven Development, and one of the first question we had was: how can we test a Solidity smart contract?
The Eris guys made a tool for that, too: sol-unit. It runs a new local blockchain network for each test, in a docker container (which ensures each test run in a clean environment), and executes the test. Tests are written as a contract, too. Neat!
Well, not so fast. sol-unit is an npm package, and to use the testing functions (assertions, etc.), we had to import the contract supplied by this package in our testing contracts. For that, there is a simple Solidity syntax:
import "../node_modules/sol-unit/.../Asserter.sol";
So far so good… or not. We hit a strange case when compiling our contracts. Apparently, you can’t import contracts with such a path. We ended up adding a command in our testmakefile target to copy those sol-unit contracts in the same folder as ours. After that, running sol-unit was simple and we started coding.
copy-sol-unit:
	@cp -f ./node_modules/sol-unit/contracts/src/* ./src/ethereum/

compile-contract:
	solc --bin --abi -o ./src/ethereum ./src/ethereum/ZeroDollarHomePage.sol ./src/ethereum/ZeroDollarHomePageTest.sol

test-ethereum: copy-sol-unit compile-contract
	./node_modules/.bin/solunit --dir ./src/ethereum
Running a Test Blockchain
Running a blockchain and deploying our contract to it was as simple as following the Eris documentation. We managed to resolve the few troubles we met using a bunch of commands that we integrated in our makefile. The whole process of running a new blockchain with our contract looks like this:
- Reset any running eris docker containers, and remove some temporary files
- Start the eris key service
- Generate our account key, and store its address in a convenient file to be loaded later by the JS API
- Generate the
genesis.json, which is the “block 0” of the blockchain
- Create and start the new blockchain
- Upload the contract to the blockchain and save its address in order to call it when we need it
After a few days of work, we were able to run the contracts on a local Eris blockchain.
From Eris to Ethereum
At this point, we wanted to try out our contracts on a local Ethereum blockchain.
To communicate with contracts inside the Ethereum blockchain, we had to use the Web3 libraries. We learned a lot while trying to use them. We realized that eris was hiding a lot of the underlying complexity.
First, our initial assumption that a contract is similar to an API was not correct. We had to distinguish functions that were only reading data from the blockchain, and functions that were writing data to it.
The first kind (read-only functions) would return the resulting data asynchronously, just like an API would do. The second kind (write functions) would only return a transaction hash. The expected side effects of a write function (changes inside the blockchain) wouldn’t be effective until the corresponding blocks would be mined, which could take some time (from ten seconds to one minute in the worst case). Moreover, we haven’t been able to make those writing functions return values, so we had to change our solidity code to call a write function first, then call a read function to get the results.
We also discovered events, which can be used to be notified when something happens in a smart contract. The smart contract is responsible for triggering the events. They look like this with solidity:
event PullRequestClaimed(unit pullRequestId, uint estimatedDisplayDate);
And they can be triggered from any of the smart contract functions, like this:
PullRequestClaimed(pullRequestId, estimatedDisplayDate);
Those events are stored permanently in the blockchain. That means we could use the blockchain as an event store. It might be the easiest way to determine if a call to a function has been successfully executed: the smart contract may trigger an event at the end of its process with failure reasons, results of computation, etc… It’s worth noting that some integration packages for Meteor are already available.
Eventually, we refactored our smart contracts to be a lot simpler in order to get almost the same features. We had to get rid of the mappings (which we haven’t been able to use - our transactions weren’t mined by the Ethereum network for some reason).
The solidity language may be close to JavaScript, it is still very young and incomplete. Arrays don’t have the functions we’re used to work with in JavaScript (not even indexOf), and strings don’t have any functions. This might be addressed by some community efforts in the near future.
The Ethereum implementation looks like this:
// in src/ethereum/ZeroDollarHomePage.sol
contract ZeroDollarHomePage {
    event InvalidPullRequest(uint indexed pullRequestId);
    event PullRequestAlreadyClaimed(uint indexed pullRequestId, uint timeBeforeDisplay, bool past);
    event PullRequestClaimed(uint indexed pullRequestId, uint timeBeforeDisplay);
    event QueueIsEmpty();

    bool _handledFirst;
    uint[] _queue;
    uint _current;
    address owner;

    function ZeroDollarHomePage() {
        owner = msg.sender;
        _handledFirst = false;
        _current = 0;
    }

    function remove() {
        if (msg.sender == owner){
            suicide(owner);
        }
    }

    function newRequest(uint pullRequestId) {
        if (pullRequestId <= 0) {
            InvalidPullRequest(pullRequestId);
            return;
        }

        // Check that the pr hasn't already been claimed
        bool found = false;
        uint index = 0;

        while (!found && index < _queue.length) {
            if (_queue[index] == pullRequestId) {
                found = true;
            } else {
                index++;
            }
        }

        if (found) {
            PullRequestAlreadyClaimed(pullRequestId, (index - _current) * 1 days, _current > index);
            return;
        }

        _queue.push(pullRequestId);
        PullRequestClaimed(pullRequestId, (_queue.length - _current) * 1 days);
    }

    function closeRequest() {
        if (_handledFirst && _current < _queue.length - 1) {
            _current += 1;
        }

        _handledFirst = true;
    }

    function getLastNonPublished() constant returns (uint pullRequestId) {
        if (_current >= _queue.length) {
            return 0;
        }

        return _queue[_current];
    }
}
The process for claiming a pull request and returning the estimated display date evolved to become:
// make a [transaction](https://github.com/ethereum/wiki/wiki/JavaScript-API#web3ethsendtransaction) call to our smart-contract write function
contract.newRequest.sendTransaction(pullrequestId, {
    to: client.eth.coinbase,
}, (err, tx) => {
    if (err) {
        throw error;
    }

    // wait for it to be mined using [code](https://github.com/ethereum/web3.js/issues/393) from [@croqaz](https://github.com/croqaz)
    return waitForTransationToBeMined(client, tx)
        .then(txHash => {
            if (!txHash) throw new Error('Transaction failed (no transaction hash)');

            // get its receipt which might contains informations about event triggered by the contract's code
            // this function might also check wether the transaction was successful by analyzing the receipt for ethereum specific error cases (insufficient funds, etc.)
            return getReceipt(client, txHash);
        })
        .then(receipt => {
            // parse those logs to extract only event data
            return parseReceiptLogs(receipt.logs, contractAbi));
        })
        .then(logs => {
            if (logs.length === 0) {
                throw new Error('Transaction failed (Invalid logs)');
            }

            const log = logs[0];

            if (log.event === 'PullRequestClaimed') {
                // timeBeforeDisplay is a BigNumber instance
                return log.args.timeBeforeDisplay.toNumber();
            }

            if (log.event === 'PullRequestAlreadyClaimed') {
                const number = log.args.timeBeforeDisplay;

                if (log.args.past) {
                    // timeBeforeDisplay is a BigNumber instance
                    return number.negated().toNumber();
                }

                // timeBeforeDisplay is a BigNumber instance
                return number.toNumber();
            }

            if (log.event === 'InvalidPullRequest') {
                throw new Error('Invalid pull request id');
            }
        });
})
And with this code, our decentralized app worked in a local Ethereum network.
Deployment to Production
Running our application in a local environment was a challenge, but deploying it to production, in the real Ethereum network, was a battle.
There are a few gotchas to be aware of. The most important one is that contracts are immutable in code. This means that:
- A contract that you deploy to the blockchain stays there forever. If you find a bug you your contract, you can’t fix it - you have to deploy a new contract.
- When you deploy a new version of an existing contract, and any data stored in the previous contract isn’t automatically transferred - unless you voluntarily initialize the new contract with the past data. In our case, fixing a bug in the contract actually wipes away recorded PRs (whether already advertised, or waiting for ad display).
- Every contract version has an id (for instance, the current ZeroDollarHomepage contract is 0xd18e21bb13d154a16793c6f89186a034a8116b74). Since past versions may contain data, keep track of past contract ids if you don’t want to lose the data (this happened to us, too).
- As you can’t update a contract, you can’t rollback an update either. Make really sure that your contract works before redeploying it.
- When you deploy a new version of an existing contract, the old (buggy) contract can still be called. Any system outside of the blockchain referencing the contract (like our Node admin app in Zero Dollar Homepage) must be updated to point to the new contract. We forgot to do it a few times, and scratched our head desperately to understand why our new code didn’t run.
- Contracts authors can kill their contract if they include a
suicide call in the code. But all the existing transactions of the contract remain in the blockchain - forever. Also, make sure that the kill switch deals with the remaining ether in the contract if you don’t want it to disappear.
Another gotcha is that every contract deployment and write operation in the blockchain costs a variable amount of ether. We managed to get 5 ETH (more about getting ether below), but we had no idea how much we would need to deploy our contract, or calling a transaction. It’s harder to test when each failed test costs money.
For the Node.js part, we decided to run it on an AWS EC2 instance, like most of our projects. To do so, we had to:
- Run an Ethereum node on the server
- Download the entire blockchain to this server
- Unlock an account with some Ether on the node
- Deploy our application and link it to the node
- Register our smart contract into the blockchain through the node
Make sure your blockchain node server has plenty of storage. The current size of the blockchain is about 15GB. The default volume size on an EC2 instance is 8GB (sigh). We had many troubles because we hadn’t downloaded the entire chain (but we didn’t realize it immediately). For instance, we had an account with 5 ETH, but for a long time the system responded as if we hadn’t unlocked our account, or as if we had no ether. Downloading the rest of the chain fixed this issue.
Likewise, unlocking our precious account containing 5 ETH was not an easy task. We did not want to hardcode our passphrase in the application, and we wanted to run the node with supervisord to ease the deployment. We finally found a way that allowed us to change the configuration without exposing our passphrase with the following supervisordconfiguration:
[program:geth]
command=geth --ipcdisable --rpc --fast --unlock 0 --password /path/to/our/password/in/a/file
autostart=false
autorestart=true
startsecs=10
stopsignal=TERM
user=ubuntu
stdout_logfile=/var/log/ethereum-node.out.log
stderr_logfile=/var/log/ethereum-node.err.log
One final security note: The Remote Procedure Call (RPC) port of the blockchain is 8545. Do not open this port on your EC2 instance! Anyone knowing the instance IP could control your Ethereum node, and steal your ether.
Ether and Gas
As explained in our first post on the blockchain, deploying and calling a contract in the Ethereum blockchain isn’t free. Since a blockchain is expensive to run, any write operation must be paid for. In Ethereum, the price of calling a write contract method depends on the complexity of the method. Ethereum comes with a list of Gas Fees, which tells you how much Ether you should add to a contract call to have it executed.
In practice, that’s a very low amount of Ether, a fraction of a single Ether. The Ethereum blockchain introduced another currency for running contracts: Gas.
1 Gas = 0.00001 ETH 1 ETH = 100,000 Gas
The Gas to Ether conversion rate will vary in the future according to the supply of computing power, and the computation demand.
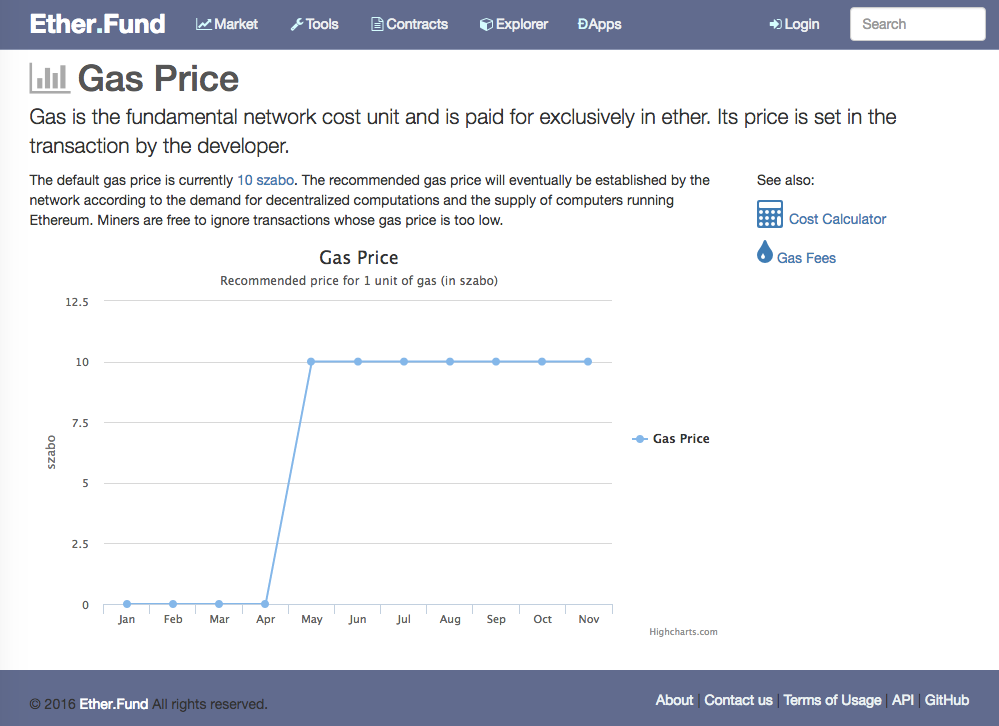
Charging a fee to process a transaction isn’t compulsory, but recommended. The Ethereum documentation says: “Miners are free to ignore transactions whose gas price is too low”. However, a mined block always give 5 ETH to the successful miner.
To call our own contracts, the Ethereum blockchain requires between 0.00045 and 0.00098 Ether (the price depends on the gas price and the gas used by the transaction).
How do you get Ether and Gas? You can buy Ether (mostly by exchanging Bitcoins), or you can mine it. In France, where we live, buying Bitcoins or Ether requires almost the same procedure as opening a bank account. It’s slow (a few days), painful, and depends on exchange rates fixed by offer and demand.
Mining Ether
So we decided to mine our Ether. That’s a good way to see if mining is profitable on Ethereum or not. We spawned a heavy Amazon EC2 instance, with strong GPU computing power (a g2.2xlarge instance). The price of this instance is 17$ per day. We installed Ethminer, and started our node. We quickly had to beef up the instance even more, because of high memory and storage requirements. The first thing a node does when it joins a blockchain is to download the entire history of past transactions. That takes a huge amount of storage: over 14GB for the blockchain’s history, and about 3GB for the Ethash Proof of Work.
Once our Ethereum node started, we had to mine for 3 days to create a valid block:
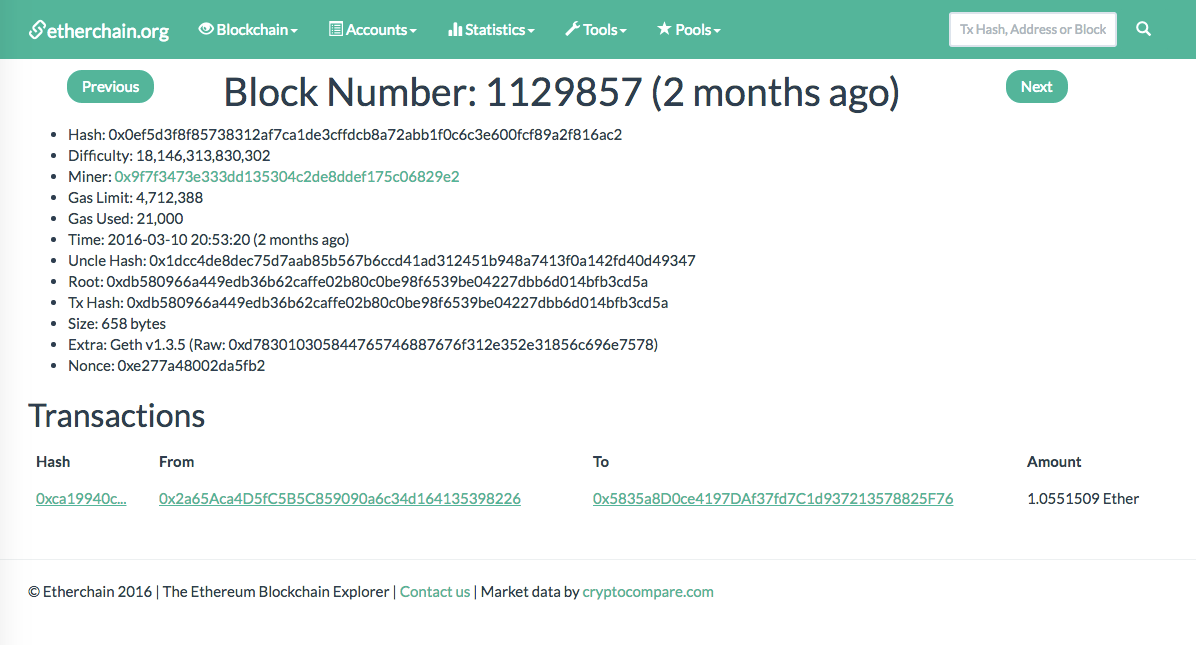
As a reminder, the Ethereum blockchain mines one block every 10 seconds. Mining a block brings up 5 Ether, which sell for roughly $55. The running cost for our beefy EC2 instance for these 3 days was about $51. All in all, it was cheaper to mine Ether on AWS than to buy it. But we were very lucky: since we mined our block, the network’s difficulty was multiplied by three.
How long can we run the ZeroDollarHomePage with 5 Ether? Let’s make the computation.
The Zero Dollar Homepage workflow implies one transaction per day, plus one transaction per claimed PR. Supposing contributors claim one PR per day, the yearly price in ether for running the platform would be at most 365 * 2 * 0,00098 = 0.72 ETH. With 5 ETH, we should normally be able to run the platform for almost seven years.
As you see, running a contract in Ethereum isn’t free, but at the current price of Ether, it’s still cheap. However, the Ether value varies a great deal. Since mining Bitcoin is becoming less and less profitable, some large Bitcoin mining farms switch to Ethereum. This makes mining harder, and makes Ether more expensive every day.
Final Surprise
Finally, our smart contract ended up working fine in our real world Ethereum node hosted on EC2.
But by the time we got there, Ethereum released their Homestead version, which brought a lot of new things and broke our code entirely. It took us about a week to understand why, through trial and error, and fix the code that wasn’t compatible anymore for obscure reasons.
Tip: The Homestead release documents a hidden Ethereum feature, private networks, to ease development. The lack of private networks was one of our reasons to use Eris in the first place.
The ZeroDollarHomePage platform is now up and running again. You can use it by opening a pull request on one of marmelab’s open-source repositories on GitHub, see the ads currently displayed on http://marmelab.com/ZeroDollarHomepage/, or browse the code of the application on marmelab/ZeroDollarHomePage. Yes, we’re open-sourcing the entire ad platform, so you can see in detail how it works, and reproduce it locally.
Debugging
The Ethereum developer experience is very bad. Imagine that you have no logs and no debug tools. Imagine that the only way to discover why a program fails is to echo “I’m here” strings every line to locate the problem. Imagine that sometimes (e.g. in Solidity contracts), you can’t even do that. Imagine that a program that works perfectly in the development environment (where you can add debug statements) fails silently in the production environment (where you can’t). That’s the developer experience in Ethereum.
If you store data in your smart contract, there is no built-in way to visualize the current state of this data after a transaction. That means you need to build your own visualisation tool to be able to troubleshoot errors.
The tools available to track Ethereum contracts and transactions are:
For instance, here is how our contract looks in etherscan:
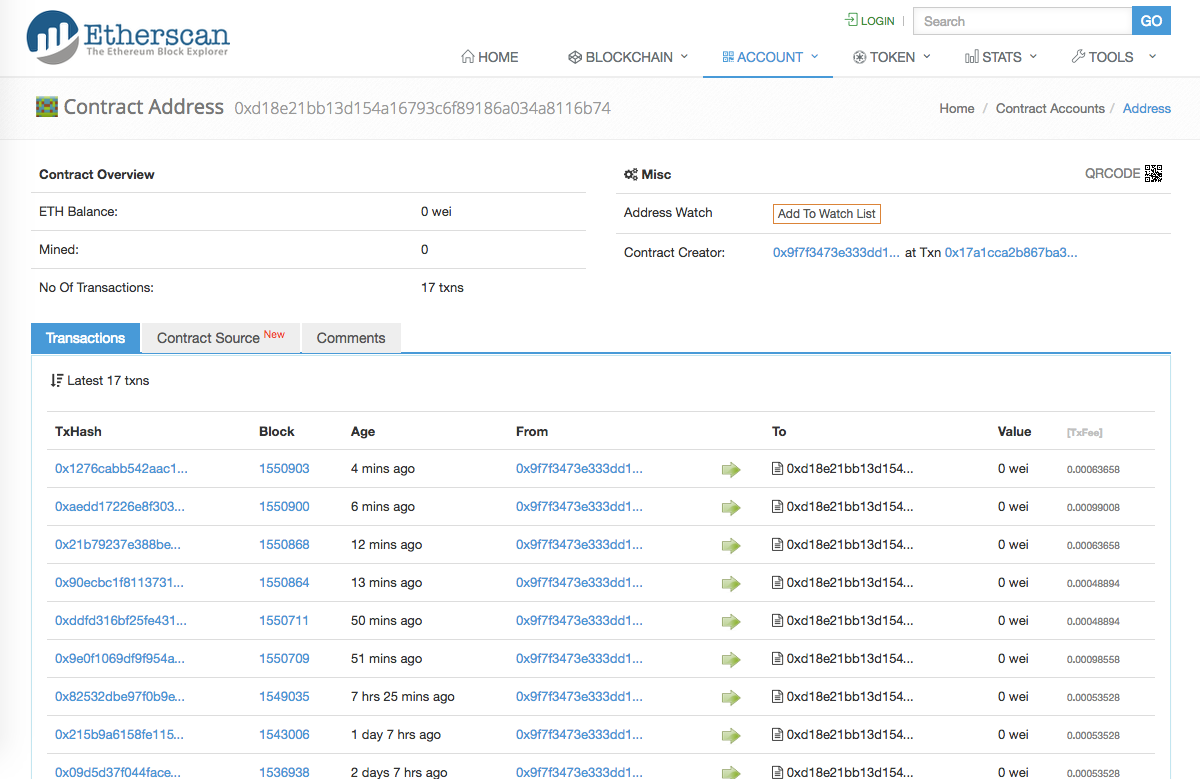
Each transaction (call to a contract method) is logged there, together with a trace of the contract execution… in machine language. Apart from making sure your call actually gets to the contract, you can’t use it for debugging.
Also, these tools can only monitor the public Ethereum network. Unfortunately, you can’t use them to debug a local blockchain.
If you have ever seen Bitcoin transaction auditing sites, don’t expect the same level of sophistication for Ethereum. Besides, the bitcoin network only has one kind of transaction, so it’s easier to monitor than a network designed to run smart contracts.
Documentation
And that’s not all: the Ethereum documentation is not in sync with the code (at least in the Frontier version), so most of the time we had to look at the libraries to try to understand how we’re expected to code. Since the libraries in question use a language that no one uses (Solidity), good luck figuring out how they work. Oh, and don’t expect help from Stack Overflow, either. There are too few people like us who dared to implement something serious to have a good community support.
Let’s be clear: we are not criticizing the Ethereum community for their lack of efforts. Once again, there is a tremendous momentum behind Ethereum, and things improve at a rapid pace. Kudos to all the documentation contributors for their work. But by the time we developed our application, the documentation state was clearly not good enough for a new Ethereum developer to start a project.
You can find a few tutorials here and there, but most of the time, copy-pasted code from these tutorials simply doesn’t work.
Here are a few resources worth reading if you want to start developing smart contracts yourself:
Conclusion
After 4 weeks of work by 2 experienced developers, we managed to make our code work in the public Ethereum network with lots of effort. Regressions and compatibility breaks in the Ethereum libraries between Frontier and Homestead versions didn’t help. Check the project source code at marmelab/ZeroDollarHomePage for a detailed understanding of the inner workings. Please forgive the potential bugs in the code, or the inaccuracies in this post - we have a limited experience in the matter. Feel free to send us your corrections in GitHub, or in the comments.
We didn’t enjoy the party. Finding our way across bad documentation and young libraries isn’t exactly our cup of tea. Fighting to implement simple features (like string manipulation) with a half-baked language isn’t fun either. Realizing that, despite years of programming experience in many scripting languages, we are not able to write a simple solidity contract is frustrating. Most importantly, the youth of the Ethereum ecosystem makes it completely impossible to forecast the time to implement a simple feature. Since time is money, it’s currently impossible to determine how much it will cost to develop a Decentralized App.
In time and resources, ZeroDollarHomepage represents a development cost of more than €20,000 - even if it’s a very simple system. As compared to the tools we use in other projects (Node.js, Koa, React.js, PostgreSQL, etc.), developing on the blockchain is very expensive. It’s a great disappointment for the dev team, and a strong signal that the ecosystem isn’t ready yet.
Is this bad experience sufficient to make up our mind about the blockchain? How come many startups showcase their blockchain services as successful innovations? What’s the real cost of building a DApp? Read the last post in this series to see what we really think about the blockchain phenomenon.