VIKTORIA RUBAN
BA at Computools
The development of technology has shown people that successful products are supposed to make life easier and more comfortable. Get instant access to applications for ordering and delivering, booking and planning, online banking, a personal assistant, and so much more by simply clicking an icon on your smartphone. Building powerful software requires an integrated approach and careful planning. It’s time to find out more about SDLC.
WHAT IS SDLC?
SDLC stands for Software Development Life Cycle.
It’s a list of project phases that helps a team understand what actually needs to be done at each step, and what artifacts need to be ready to start a particular phase.
LET’S TAKE A LOOK:
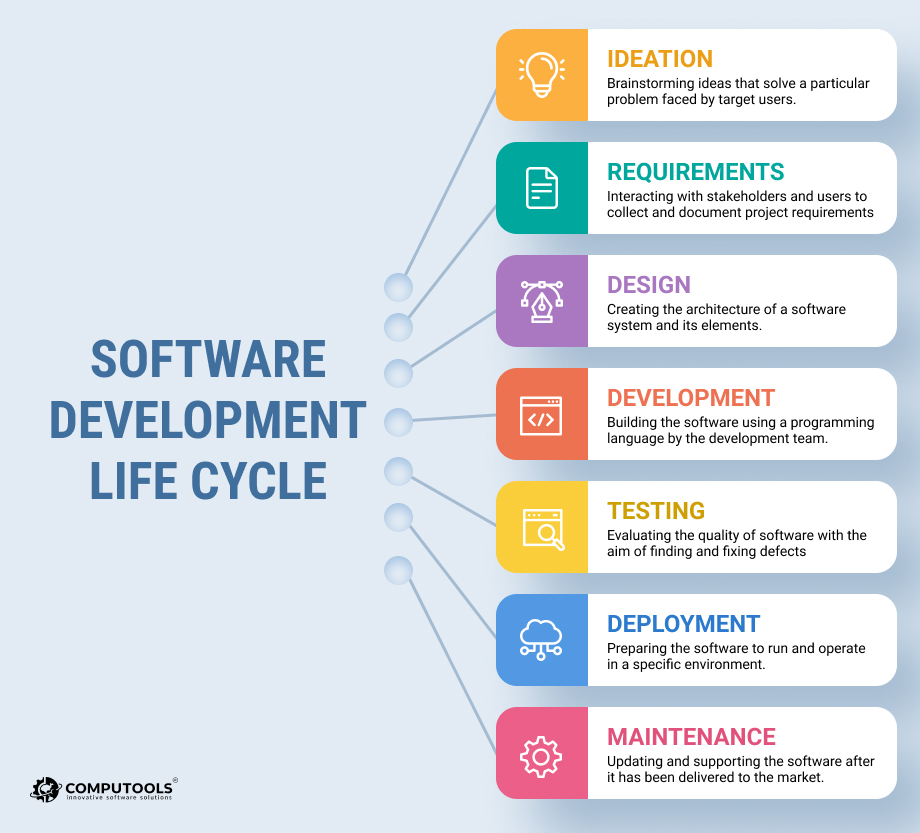
1. IDEATION
At this stage, the team has a lot to learn about the client’s business and ideas.
Here are the basic actions conducted during the ideation phase:
● review the documentation sent by the client (if it exists);
● research the domain and spend time getting familiar with it (especially if it’s niche);
● conduct meetings with the stakeholders to discuss basic requirements, provide suggestions, and brainstorm ideas;
● make sure to consider the following:
○ Whose opinion can influence the product (it can be someone from the client’s side, specific departments like Marketing, or national or international regulations, laws, and institutions)?
○ What are the goals of these people, departments, or institutions?
○ Who is the product being made for?
○ Who will use the product?
○ Why is the product interesting and/or useful for these people?
○ Where do they live?
○ Do their daily routines need to be considered?
○ Does the client have any ideas about the monetization strategy for the product?
By the end of this first stage, the team already has some information about the product and found a common ground with the client.
○ general idea of the project;
○ high-level mind map;
○ stakeholders and their goals;
○ competitors;
○ key terms and definition
2. REQUIREMENTS
This stage is still a part of the discovery phase. It gives a business analyst a chance to gather any specific requirements for the project and prepare the documentation needed for the next step.
Below are the main techniques used to elicit requirements:
● interviewing;
● holding workshops;
● brainstorming;
● observing.
By the end of this stage, a software requirements specification (SRS) is drafted and continuously reviewed by a quality assurance specialist to help all technical and non-technical stakeholders stay on the same page. The document describes functional and non-functional requirements and comes with a prototype.
3. DESIGN
This step is based on work done during the previous step. A solution architect prepares documentation pertaining to software architecture describing the architectural approach and data flow for the particular project, as well as technical decisions and third-party integrations.
During this phase, a test strategy is also defined for the further stages.
The perfect case is when all the documentation can be checked by stakeholders in terms of product relevance and legal constraints.
By the end of this stage, the discovery phase of the software development life cycle is considered to be finished and the project is ready for development.
4. DEVELOPMENT
Only at this step developers start implementing the project according to prepared documentation.
The quality of this step greatly depends on developers’ experience and how well documents are detailed.
5. TESTING
This stage usually goes hand in hand with development. Testing provides quality assurance and makes sure that the project is implemented according to the requirements.
During testing, if any number of bugs are found, the team returns to development again. It’s common that a short cycle of these two steps will repeat until all bugs are removed.
There are several types of testing conducted at this stage:
● manual testing according to acceptance criteria;
● regression testing;
● load testing;
● unit-testing (optional);
● integrational (optional);
● auto testing (optional).
6. DEPLOYMENT
This is the final stage of the project. It implies deployment to the product server and/or digital distribution platforms.
7. MAINTENANCE
After product release, additional support may be needed. Additional documentation and support hours are discussed individually.
Several SDLC models can be used during the software development process:
● waterfall model;
● iterative model;
● V-model;
● spiral model;
● big bang model.
Each model has a specific set of steps and special processes. The team can experience different kinds of work efficiency by deploying different models. The most common is the iterative model.
Summing up, choosing an SDLC model suitable for your business and following the above mentioned software development life cycle steps helps facilitate work efficiency and successful product development.